プリンタープロフィールを設定する
プリンタープロフィールについて
プリンタープロフィールを使うと、初期設定またはカスタマイズされたプリンター設定で1台以上の端末を構成できます。プリンタープロフィールは、プリンターを接続して設定を適用する前または接続する際に作成して割り当てることができます。たとえば、プリンタープロフィールを使ってプリンターに接続されているすべての端末でレシートを自動的に印刷できます。
プリンタープロフィールを作成するときに、以下のプリンターのジョブタイプを設定できます。
レシート
-
対面決済のオーダーシート
オーダーシート1枚に商品1点:この設定を有効にすると、グループ化されている商品でも1点ずつ個別のシートに自動印刷されます。
上部マージンを削除する
印刷するカテゴリ:オーダーシートにはすべての商品が記載されます。カテゴリを作成すると、オーダーシートに印刷する商品を指定できます。
キッチン名を印刷する:このステーションで印刷された商品、バリエーション、カスタマイズにはキッチン名が表示されます。キッチン名はSquare データから設定できます。
同一の商品をまとめる:詳細情報が同一の商品は、自動的に1つの単位品目にまとめられます。
-
オンライン&キオスク端末のオーダーシート
オーダーシート1枚に商品1点:この設定を有効にすると、グループ化されている商品でも1点ずつ個別のシートに自動印刷されます。
上部マージンを削除する
新規注文を自動印刷する
対応中の注文を自動印刷する
印刷するカテゴリ:オーダーシートにはすべての商品が記載されます。カテゴリを作成すると、オーダーシートに印刷する商品を指定できます。
キッチン名を印刷する:このステーションで印刷された商品、バリエーション、カスタマイズにはキッチン名が表示されます。キッチン名はSquare データから設定できます。
同一の商品をまとめる:詳細情報が同一の商品は、自動的に1つの単位品目にまとめられます。
オーダーシートのお客様控え
取消済みオーダーシート
バーコードラベル
はじめに
プリンターを接続する前にプリンタープロフィールを作成するには、次の3つのオプションがあります。
Square データでプリンタープロフィールを作成する
Square POSレジアプリからプリンタープロフィールを作成する
Square KDSからプリンタープロフィールを作成する
プリンタープロフィールが作成されると、POSレジアプリから直接POSレジ端末に割り当てることができます。
プリンターを接続するときに、初期設定またはカスタム設定で新しいプロフィールを作成することもできます。初期設定を使うと、プリンターの種類と場所に応じてプロフィールが自動的に割り当てられ、名前が付けられます。詳しくは、POSレジにプリンターを接続する方法をご覧ください。
注文に複数のカテゴリに属する商品が含まれている場合、プリンタープロフィールで設定されたカテゴリに一致するすべての商品のオーダーシートが、リンクされた各プリンターで印刷されます。
ステップ1:プリンタープロフィールを作成する
- Square データにログインし、[設定] > [デバイス管理] > [プロフィール] > [プリンタープロフィール] の順にクリックします。
- [プロフィールを作成] をクリックし、プリンタープロフィール名を入力します。
- 必要に応じて、このプロフィールを使って印刷する商品をオンにします。
- 店舗を選択します。初期設定では、プリンタープロフィールはすべての店舗で利用できます。また、特定の店舗のみに表示するようにも設定できます。
- [保存] をクリックします。
- Square POSレジアプリを開きます。
- [≡その他] > [設定] > [ハードウェア] > [プリンター] の順にタップします。
- プロフィールがまだ選択されていない場合は、[プロフィール] をタップします。
- [プロフィールを作成] をタップし、プリンタープロフィール名を入力します。
- 必要に応じて、このプロフィールを使って印刷する商品をオンにします。
- 戻る矢印 > [保存] の順にタップします。
- 次に、接続されているプリンターを各デバイスのプリンタープロフィールに手動で割り当ててください。デバイスはプリンタープロフィールを共有しますが、特定のプリンターからプロフィールへの接続はデバイス上でローカルに行われます。
ステップ2:プリンタープロフィールをプリンターに割り当てる
プリンタープロフィールは、POSレジアプリからプリンターに割り当てることができます。以下のとおりに進めます。
[≡その他] > [設定] > [ハードウェア] > [プリンター] の順にタップします。
[プロフィール] をタップし、既存のプリンタープロフィールを選択します。
[リンク済みプリンター] の横にある [編集] をタップします。
接続済みのプリンターを選択し、[新しいプリンターを接続] をタップします。
[保存] をタップします。
Square データから端末にプリンタープロフィールを割り当てることはできません。プリンタープロフィールの作成、編集、削除はSquare データから行えますが、その場合でも端末にプリンターを割り当ててください。
ステップ3:プリンタープロフィールを編集する
Square データからは、プリンタープロフィールの設定を調整したり、プリンタープロフィールを複製したり、プリンタープロフィールを削除したりできます。POSレジアプリからは、プリンタープロフィールを無効にしたり、プリンタープロフィールの設定を調整したり、プリンタープロフィールを削除したりできます。
- Square データにログインし、[設定] > [デバイス管理] > [プロフィール] > [プリンタープロフィール] の順にクリックします。
- 既存のプリンタープロフィールを選択します。
- [プロフィール設定] の横にある [編集] をクリックします。
- プリンタージョブと場所を調整します。
- [保存] をクリックします。
プロフィールに加えた変更は、そのプロフィールが割り当てられているすべてのプリンターに適用されます。
- Square データにログインし、[設定] > [デバイス管理] > [プロフィール] > [プリンタープロフィール] の順にクリックします。
- 既存のプリンタープロフィールを選択します。
- 3つの点 (•••) をクリックします。
- [プロフィールを複製] または [プロフィールを削除] をクリックします。
- 複製されたプロフィールにはプリンタープロフィール名を入力します(該当する場合)。
- [保存] をクリックします。
- Square POSレジアプリを開きます。
- [≡その他] > [設定] > [ハードウェア] > [プリンター] の順にタップします。
- [プロフィール] をタップし、既存のプリンタープロフィールを選択します。
- [ステータス] をオフにします。
さまざまなプリンタープロフィールの視覚的な例を確認する
以下に、オーダーシートを特定のプリンター、厨房、および進行管理ステーションに転送するさまざまな方法の例をいくつかご紹介します。画像が画面に対して小さすぎる場合は、画像をクリックして [新しいタブまたはウィンドウで開く] を選択し、フルサイズで表示してください。
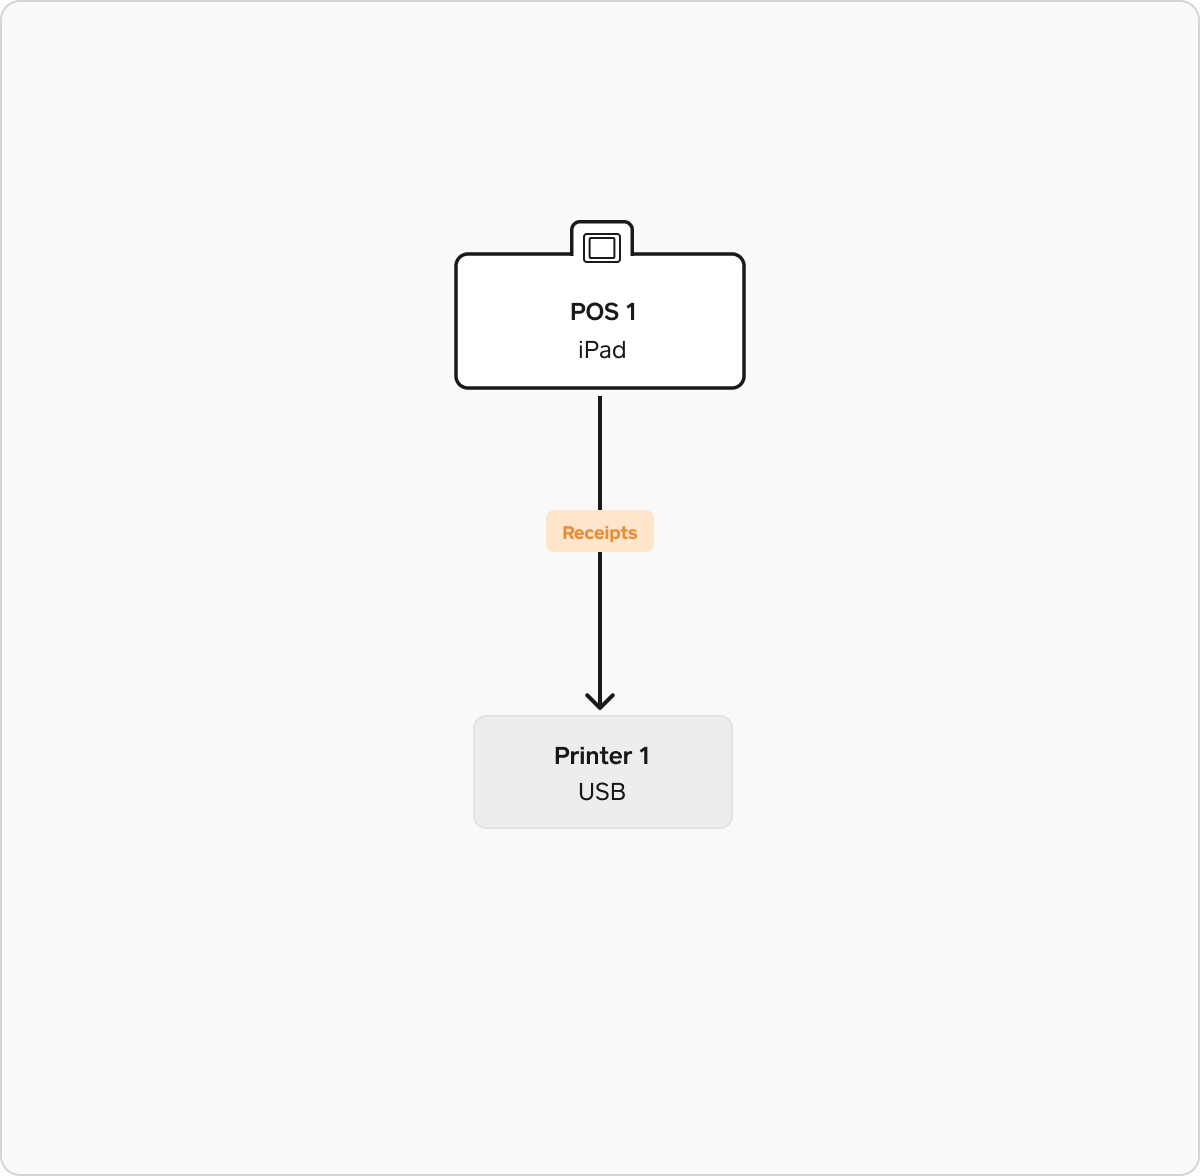
This example features one Point of Sale with a USB-connected printer for receipts. This setup is common in retail or grab-n-go style restaurants. There is a single printer profile configured for receipts with the setting “Print receipts: Automatically”.
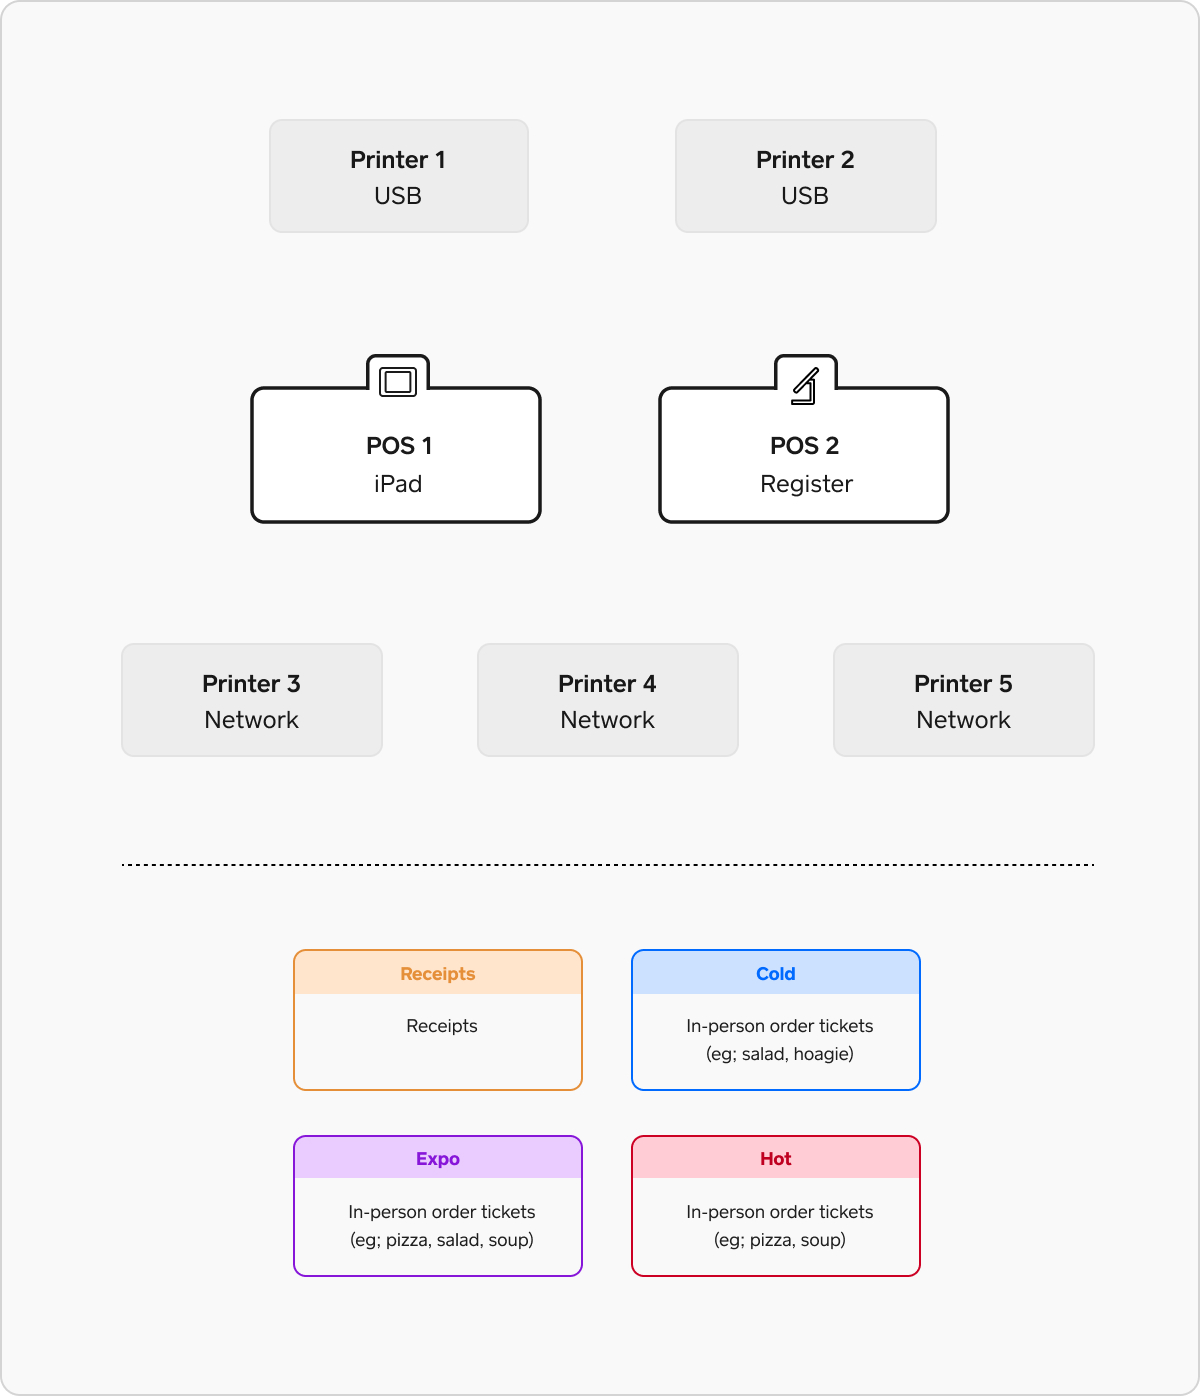
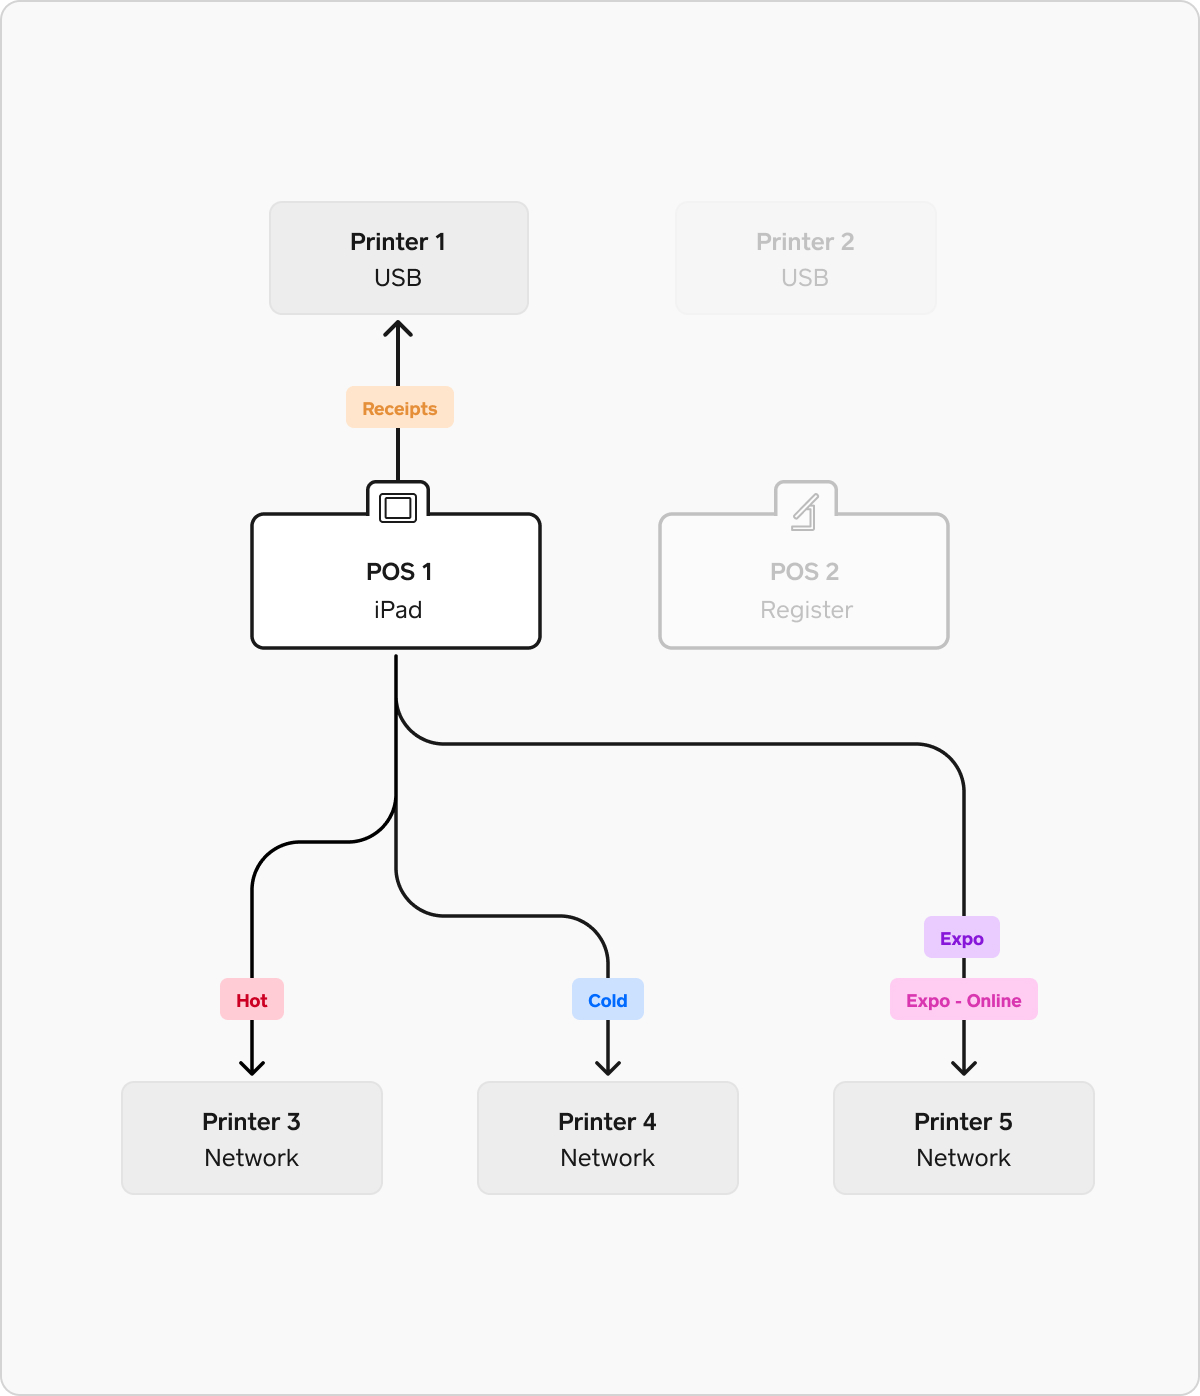
In this example there are multiple points of sale and a more complex kitchen environment with multiple prep stations. This example has a prep station for “hot” foods, a prep station for “cold” foods, and an expo station where orders are assembled.
To configure printing in this environment, you will need 3 printer profiles (plus one for receipts, as shown in the simple retail example above).
- Hot profile: This profile is set to in-person order tickets and set to print only item categories that should go to the hot prep station (cooked food, fried foods, etc).
- Cold profile: This profile is set to in-person order tickets and set to print only item categories that should go to the cold prep station (salad, cold sides).
- Expo profile: This profile is set to in-person order tickets and set to print all item categories.
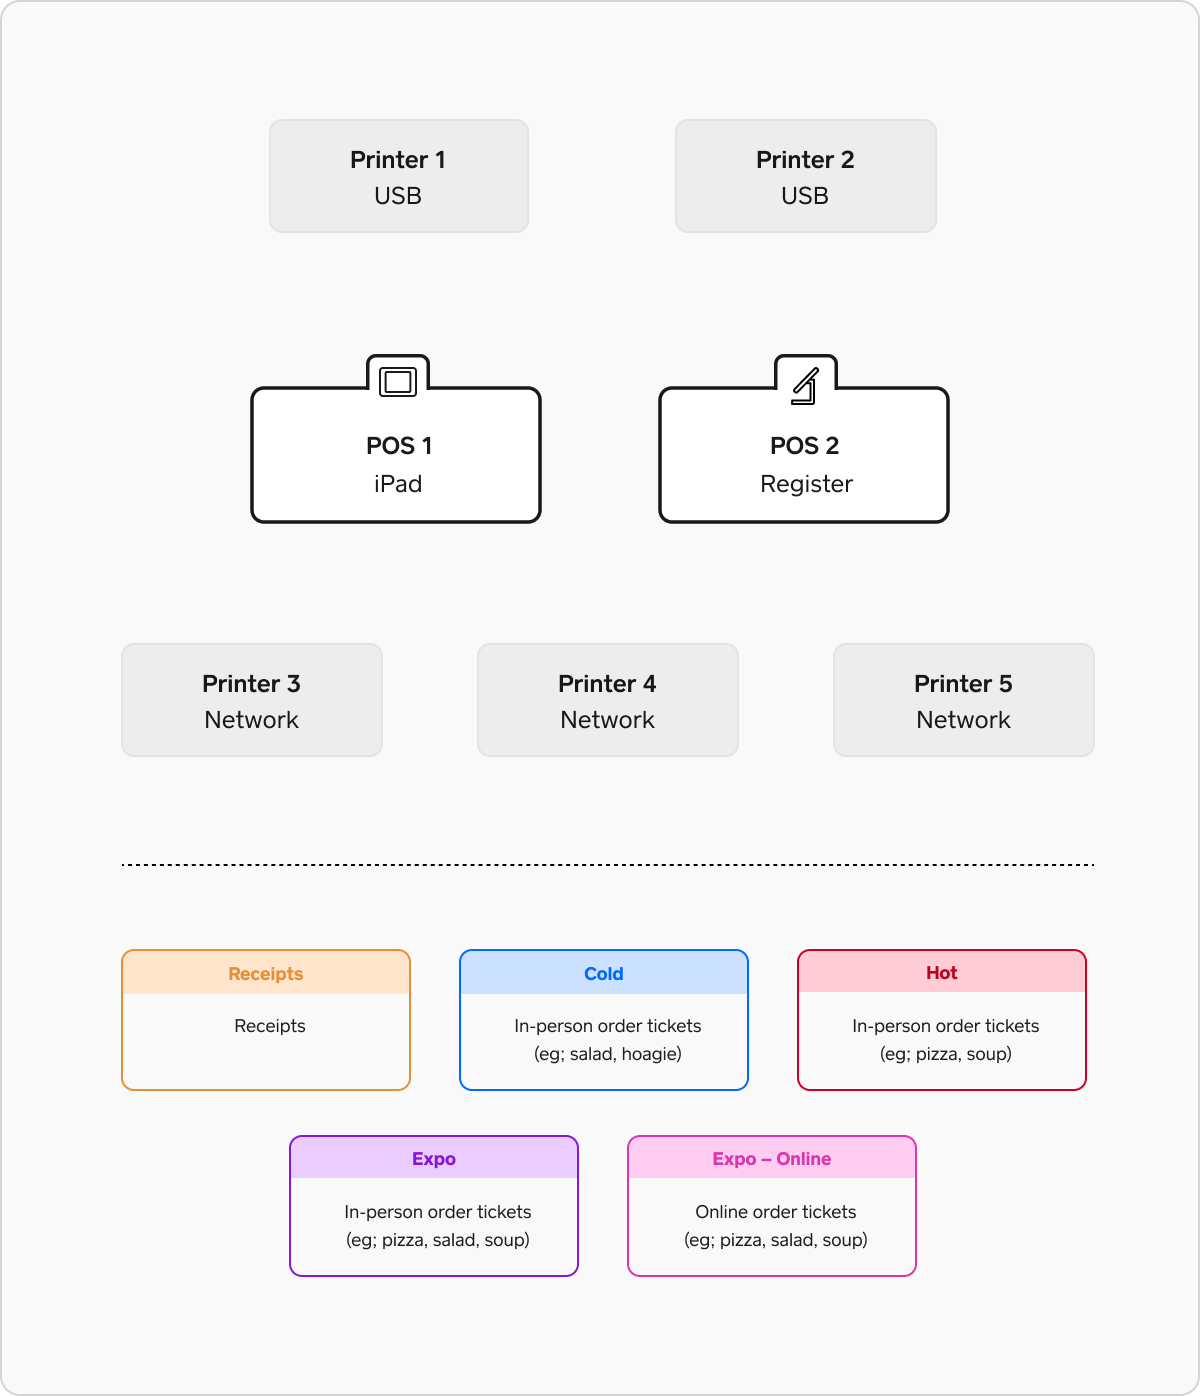
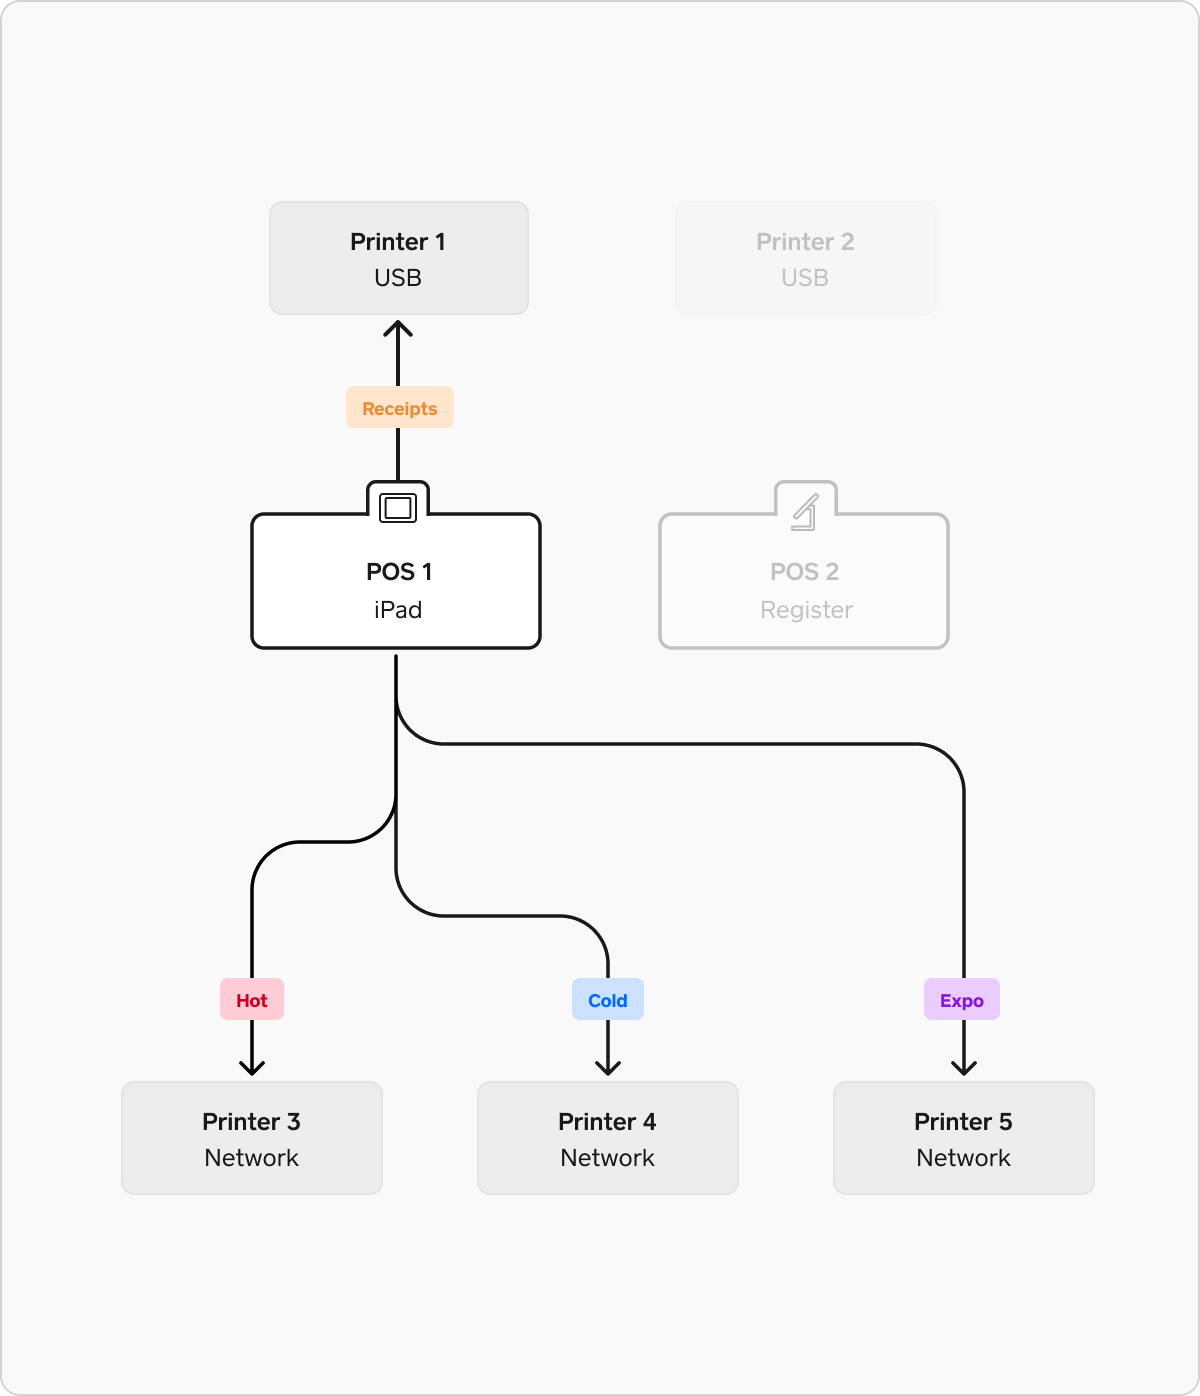
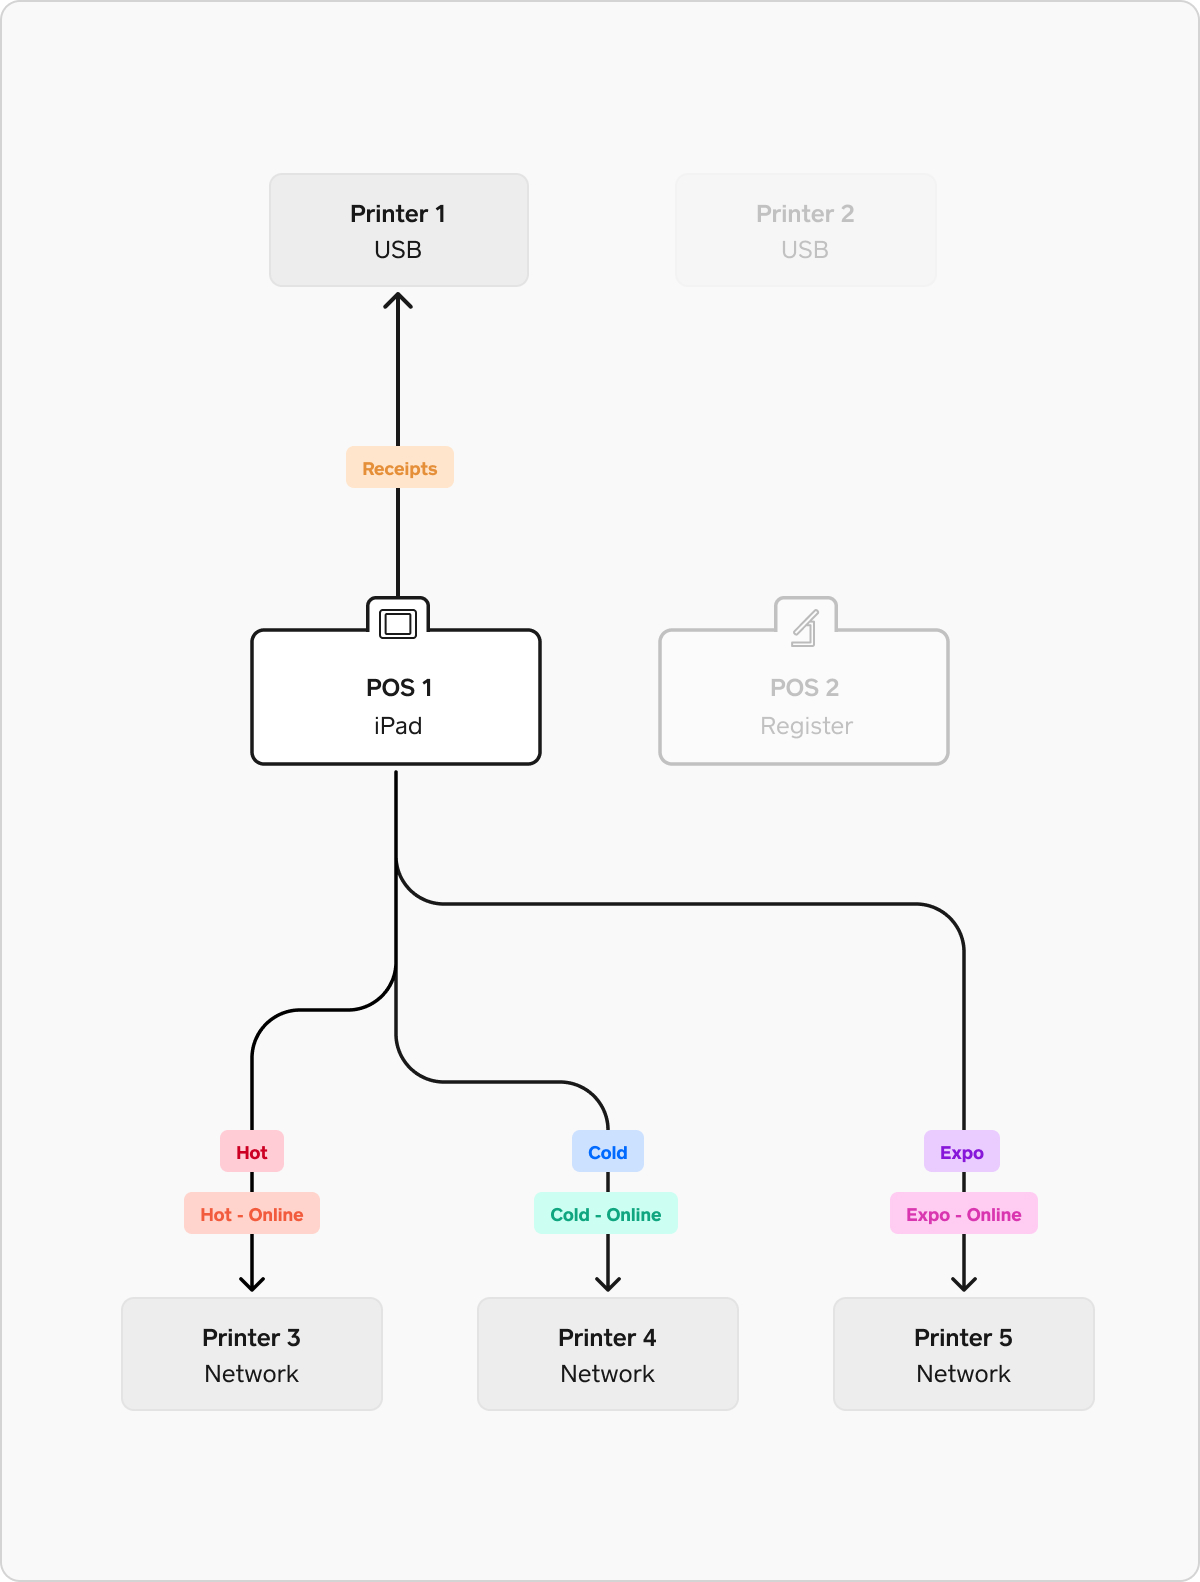
In this example there are multiple points of sale and a more complex kitchen environment with multiple prep stations. This example has a prep station for “hot” foods, a prep station for “cold” foods, an expo station where orders are assembled, and an expo station where all online orders are routed to.
To configure printing in this environment, you will need 4 printer profiles (plus one for receipts, as shown in the simple retail example above).
- Hot profile: This profile is set to in-person order tickets and set to print only item categories that should go to the hot prep station (cooked food, fried foods, etc)
- Cold profile: This profile is set to in-person order tickets and set to print only item categories that should go to the cold prep station (salad, cold sides)
- Expo profile: This profile is set to in-person order tickets and set to print all item categories
-
Expo online profile: This profile is set to online order tickets and set to print all item categories
This profile must be used by only one point of sale device–assigned to a printer from just one point of sale. This profile can not be active on other points of sale.
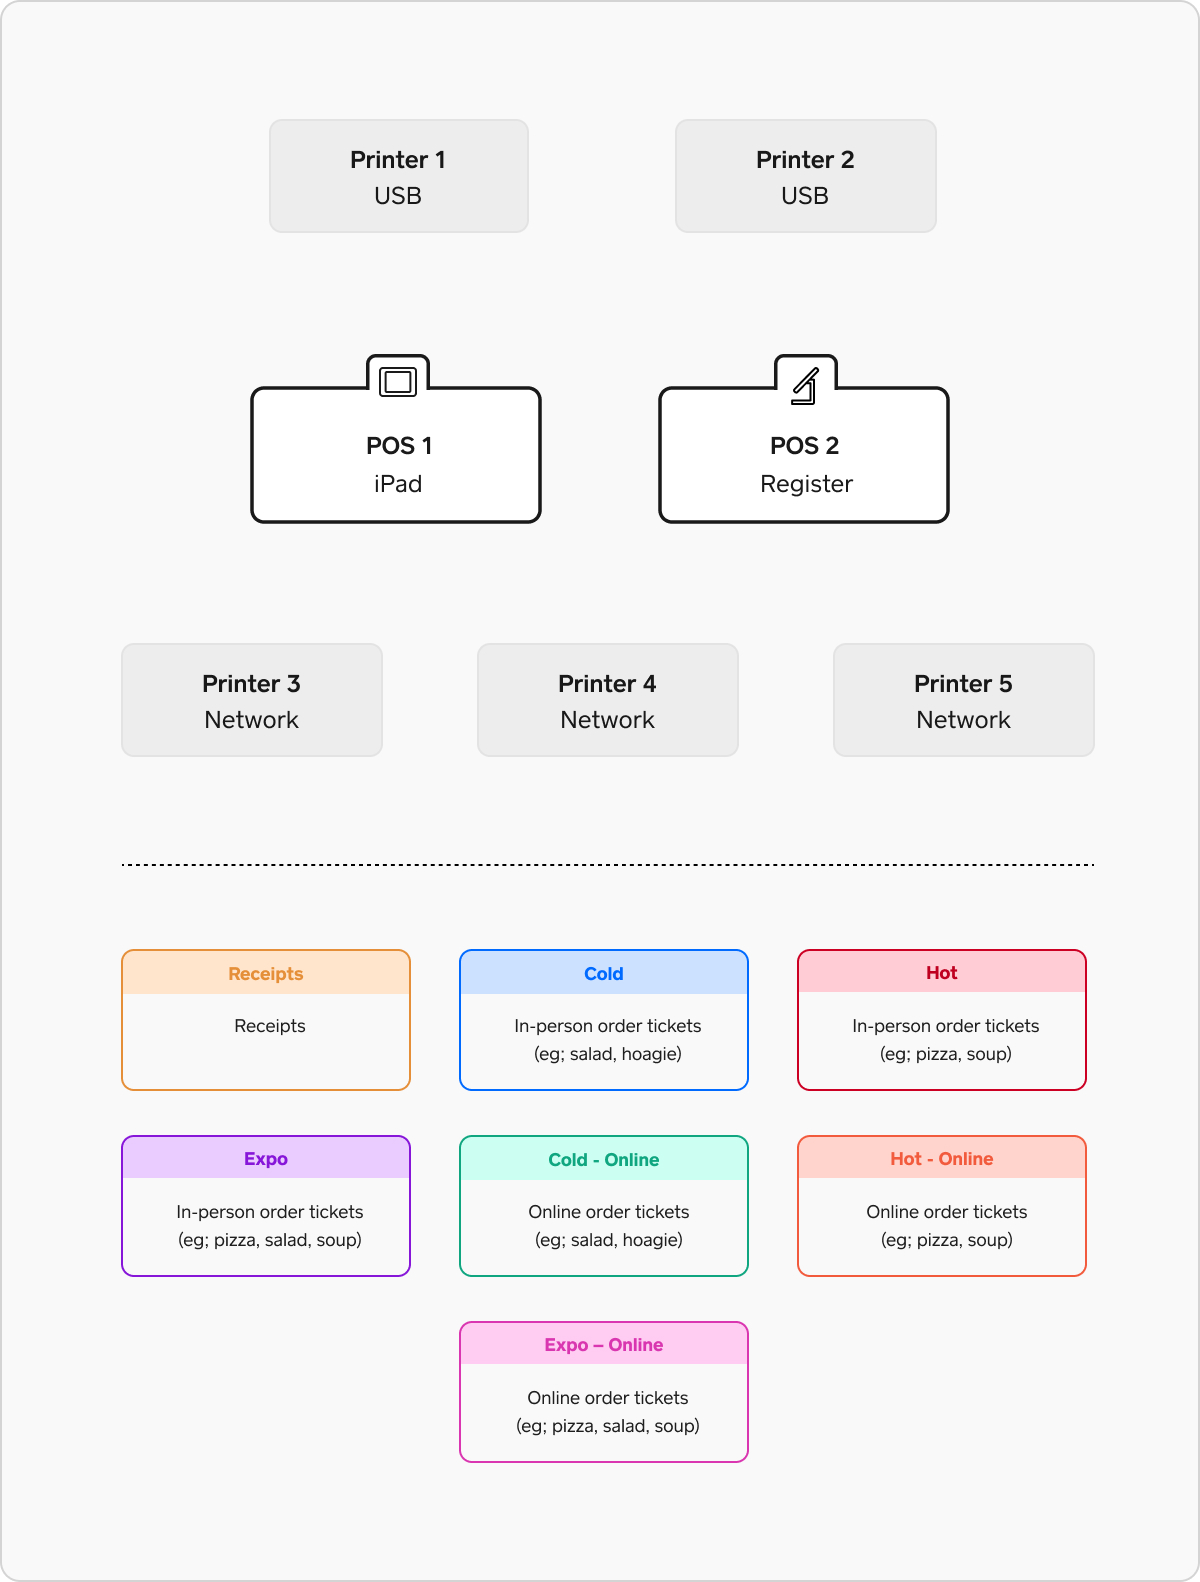
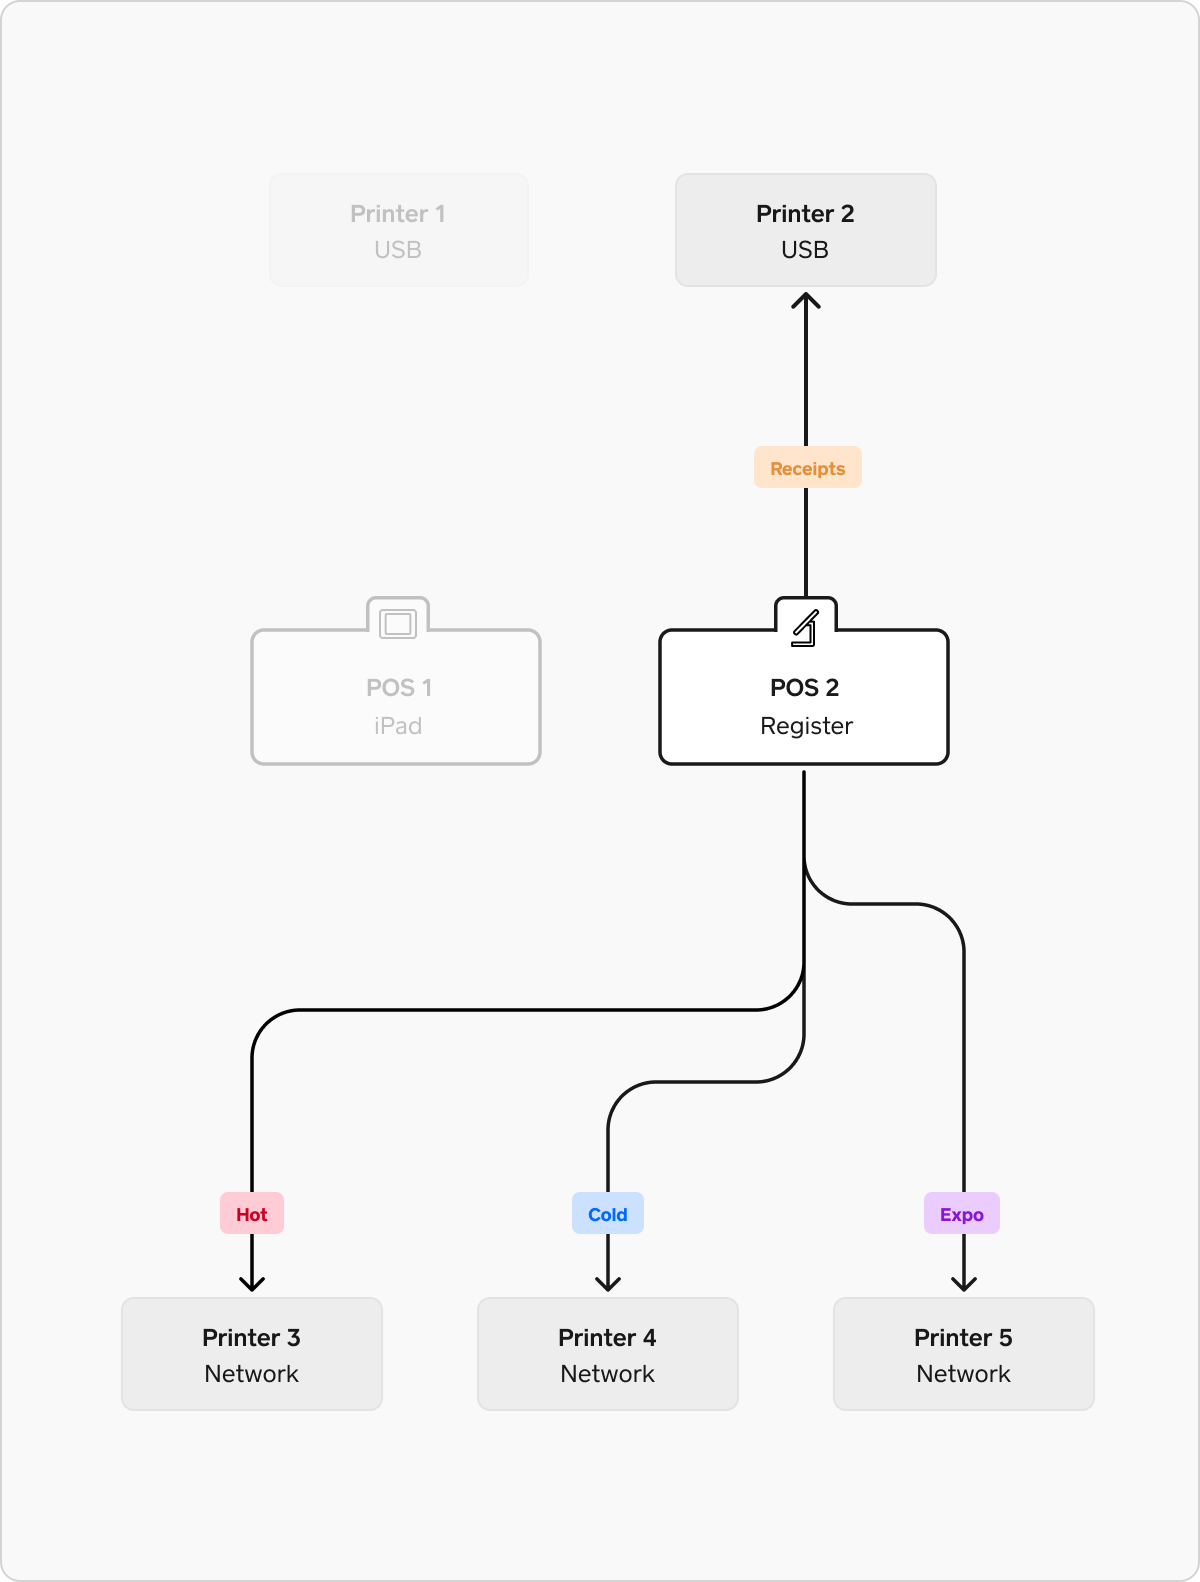
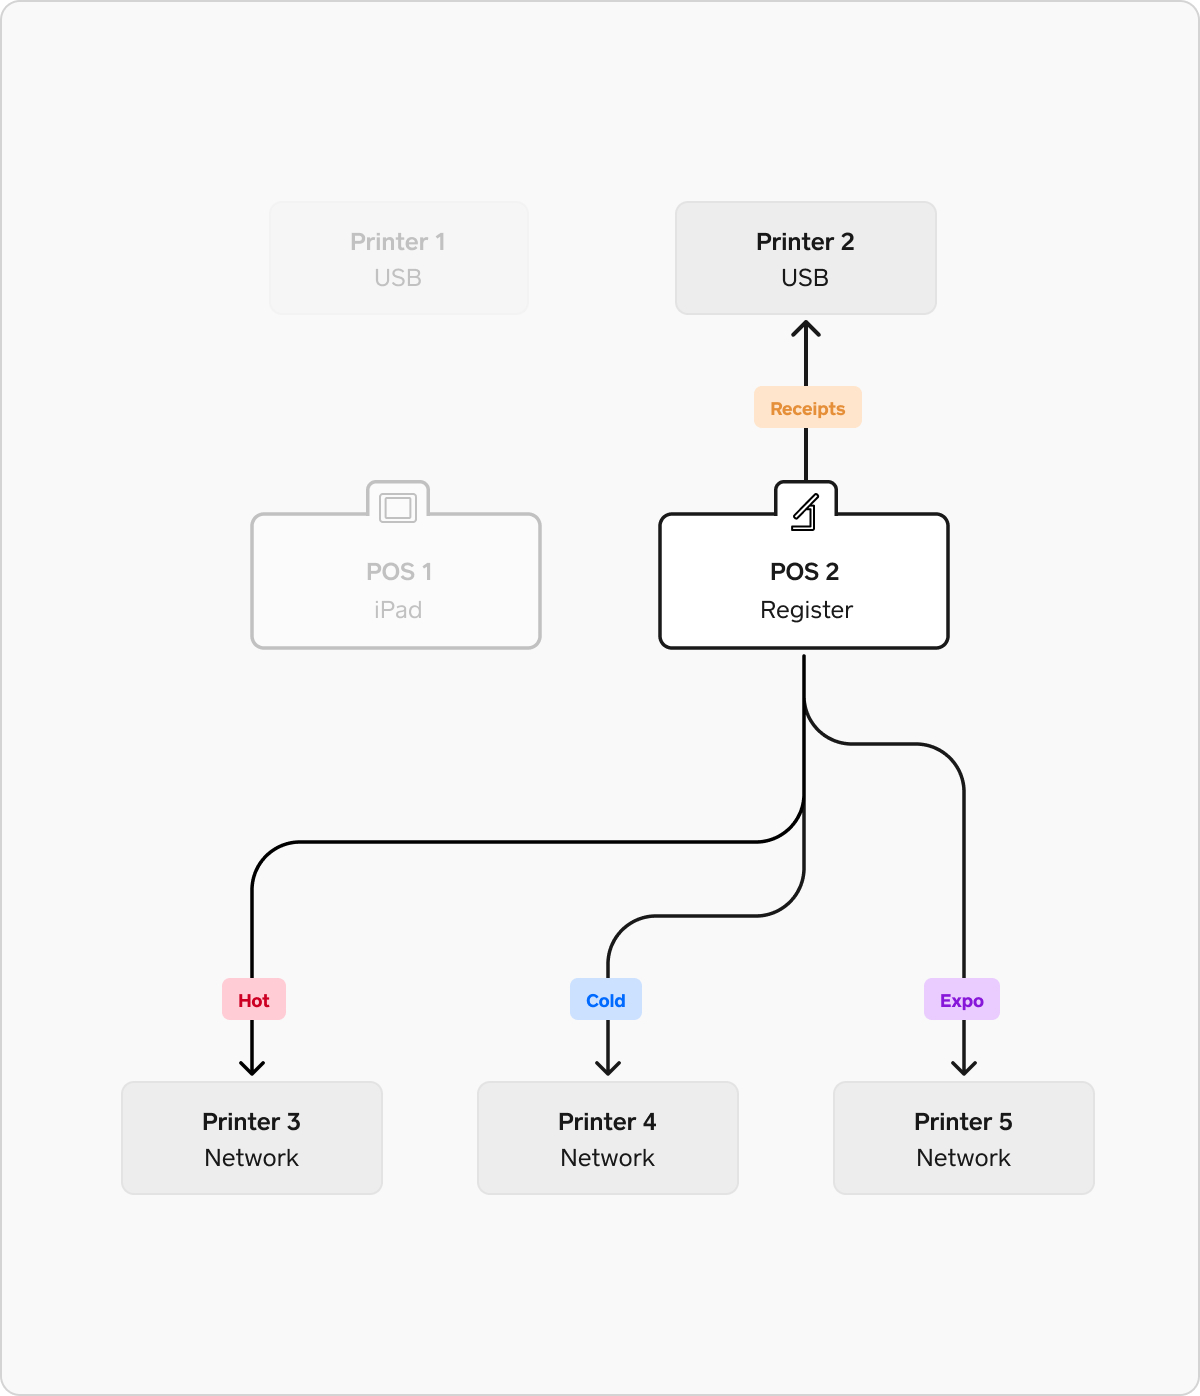
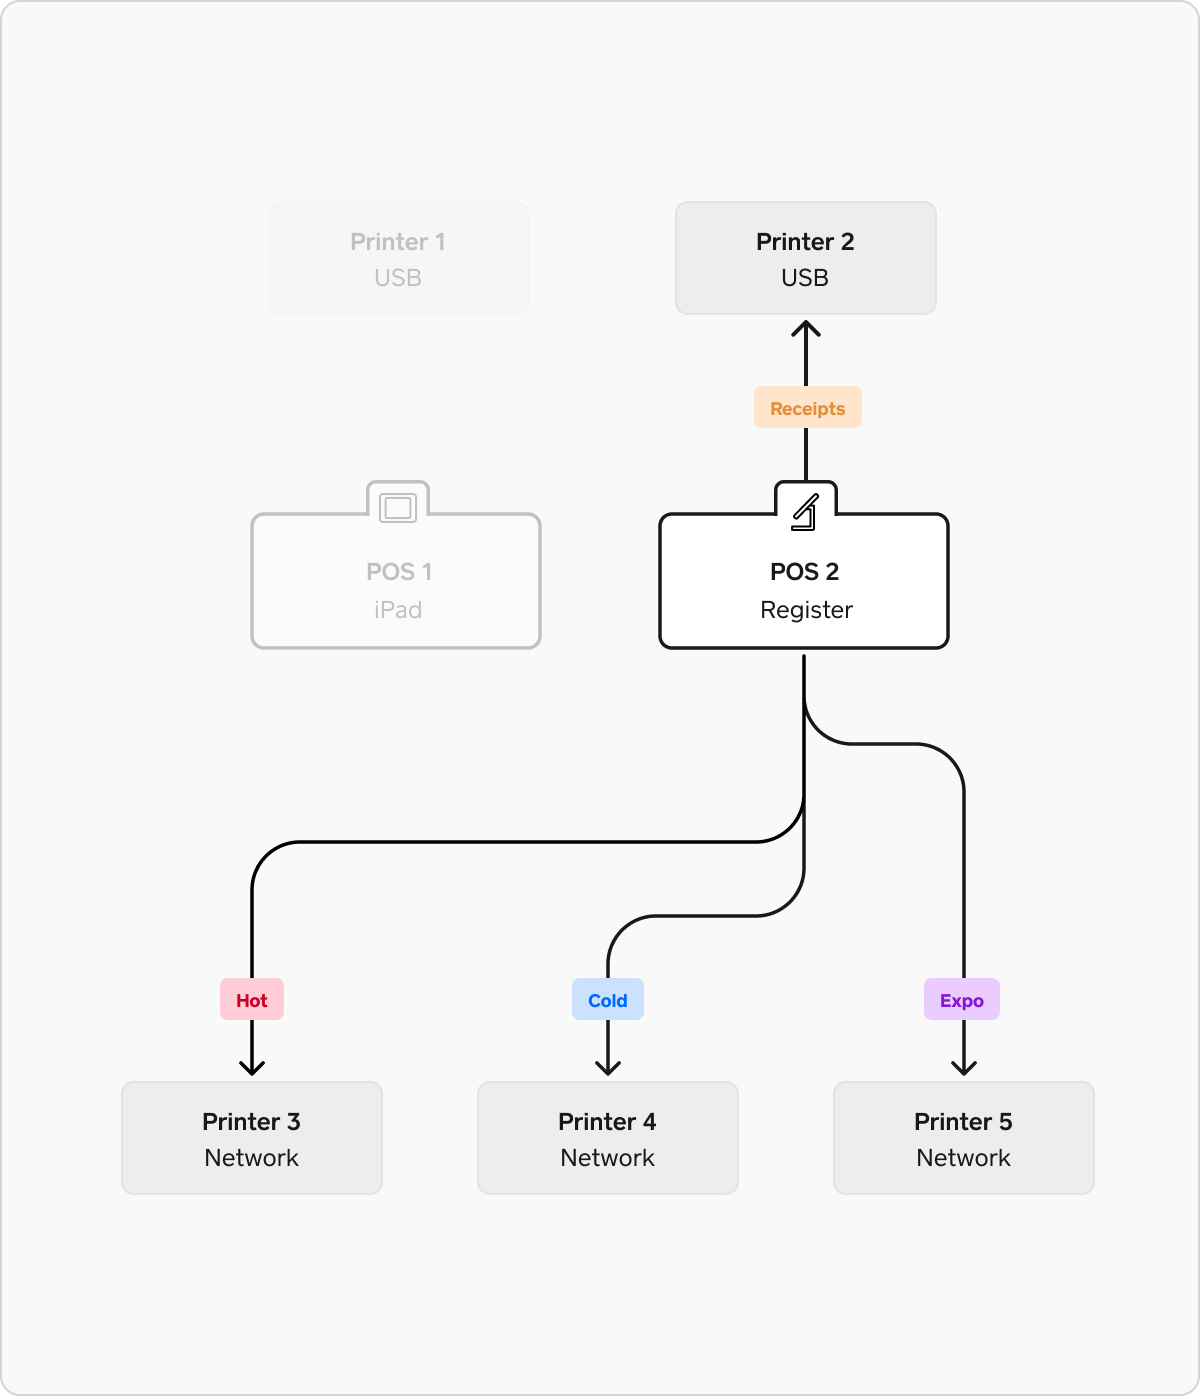
In this example there are multiple points of sale and a more complex kitchen environment with multiple prep stations. This example has a prep station for “hot” foods, a prep station for “cold” foods, an expo station where orders are assembled, with all online orders being sent to the prep stations and expo.
To configure printing in this environment, you will need 6 printer profiles (plus one for receipts, as shown in the simple retail example above).
- Hot profile: This profile is set to in-person order tickets and set to print only item categories that should go to the hot prep station (cooked food, fried foods, etc)
- Cold profile: This profile is set to in-person order tickets and set to print only item categories that should go to the cold prep station (salad, cold sides)
- Hot online profile: This profile is set to online order tickets and set to print only item categories that should go to the hot prep station (cooked food, fried foods, etc). This profile must be used by only one point of sale device–assigned to a printer from just one point of sale. This profile can not be active on other points of sale.
- Cold online profile: This profile is be set to online order tickets and set to print only item categories that should go to the cold prep station (salad, cold sides) This profile must be used by only one point of sale device–assigned to a printer from just one point of sale. This profile can not be active on other points of sale.
- Expo profile: This profile is set to in-person order tickets and set to print all item categories
- Expo online profile: This profile is set to online order tickets and set to print all item categories. This profile must be used by only one point of sale device–assigned to a printer from just one point of sale. This profile can not be active on other points of sale.